Visual design and UI mock-ups are the effective way for communicating various aspects of the application to end users. However, it falls short when it comes to capturing details of interactions and behaviors of the application. Often, our workflow transitions from visual design to final implementation, with a brief phase of semi-clickable mock-ups. So, real interaction design does not start until the backend development is done and wired up to the front-end. In one of the recent project with somewhat complicated backend integrated with the external system, we started getting good end-user feedback not until they started seeing and experiencing the data flowing through the application. It was somewhat late in the game, it would have been significantly helpful for UX designers and developers if this feedback came at an earlier stage.
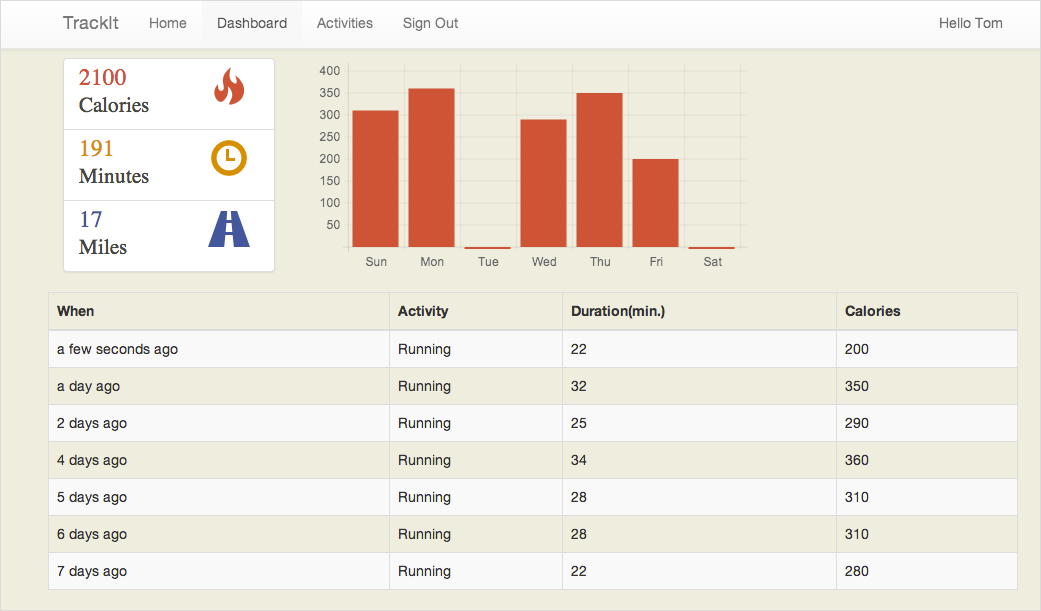
The functional prototype could help bridge this gap and start the feedback loop earlier in the development cycle. In this post, I am exploring the techniques for creating a functional prototype using the AngularJS without real backend. I selected fitness activity tracking as an application to be prototyped. Sign-up, sign-in, log activity, view dashboard are the features selected for prototyping. You can see the final outcome in the screenshot below, you could play with the live version here. All the data is held in the page memory, so feel free to sign-up, log activity and switch between the users. You could also log in using the demo user with ‘x’ as email and password.
This prototype leverages Angular’s $httpBackend for mocking the HTTP calls, while allowing rest of the application to the user the $resource as if the real backend is available. Not this approach only helps to hash out lots of details of the front-end implementation, but a large part of the code would be reusable when the real backend becomes available. As your RESTful endpoints become available, you could just remove the code that mocks those HTTP calls. Now, let’s dive into the implementation details.
Enter the $httpBackend and $http
These are the two of the many building blocks of the AngularJS framework. $httpBackend, as the name indicates, provides low-level backend/ service for interacting with the XMLHttpRequest. $httpBackend deals with the browser incompatibilities and nuances for enabling cross-origin requests using JSONP. $http is a layer on top of $httpBackend, providing easy to use API to interact with, so you almost never require interacting directly with the $httpBackend. ngMock module includes service with the same name - $httpBackend which can mock the HTTP calls. In situations where you would like to mock the back-end behavior for backend-less development or testing, you need to use $httpBakend from ngMock module. So, make sure to include the angular-mocks.js on the page. This beautiful layered abstraction over the browser infrastructure for communicating with the backend opens up lots of possibilities.
Lets Mock the Backend
AngularJS provides a nice service - $resource for easily interacting with the RESTful endpoints. $resource provides a higher level of abstraction over the $http, so you don’t have to write the boilerplate code for performing standard CRUD operations. Under the hood, $http uses the $httpBackend that could be configured to respond to certain URL requests instead of making the actual HTTP call. Ability to intercept the calls to specific URLs and to respond it is the core concept of prototyping technique discussed here. Following code snippet shows a way to intercept GET calls to the URL ‘/api/101/activity’ and responding with an array containing one activity.
$httpBackend.whenGET(‘/api/101/activity/‘).respond(function(method, url, data){
	return [200, [{workoutDate: new Date(), activityType: 'Running', duration: 22, calories: 280, distance: 2.2}]];
});
run block - when your application is bootstrapping, is the best place to configure all the necessary HTTP call mocking. You could either use hooks defined for specific HTTP methods(i.e. whenGET, whenPOST, whenPUT, etc.) or use a generic method when(method, url, data, headers) for defining your backend. URLs could be defined as regular expressions, which could be handy. Following code shows how the RegExp URL pattern is defined for intercepting the Activity creation calls. The user id part of the URL is extracted just by doing the RegEx matching.
$httpBackend.whenPOST(/api\/(\d+)\/activity/).respond(function(method, url, data){
	data = JSON.parse(data);
	var searchResult = url.match(/api\/(\d+)\/activity/);
	var userId = parseInt(searchResult[1]);

	var savedActivity = activitiesRepository.save(data);
	return [200, savedActivity];
});
For some of the URLs, you might like to make a real HTTP call instead of mocking them. Such URLs needs to be explicitly flagged as passThrough. If your application makes a request to the URL that is not mocked nor included for the passThrough would result into error. Following passThrough rule allows to make real HTTP calls for all the view under partials directory.
$httpBackend.whenGET(/\partials\//).passThrough();
Repository for your data
Once you start intercepting the HTTP calls, next question would be - where to put the data. Repository is such generic repository that provides methods like save, delete, find and so on. It maintains array for storing the objects, and it automatically assigns the id for the new object being added. In this sample we need a repository to store the registered users and activities for each user, the repositories are defined as shown below. After intercepting the call, the appropriate method is called on the repository. The repository uses Lo-Dash to work with the collections.
var userRepository = new utils.Repository();
var activitiesRepository = new utils.Repository();

var savedActivity = activitiesRepository.save(data); //add or update the activity
var activities = activitiesRepository.findAll({userId: userId}) //find activities for specific userId
You could play with the live version here and code could be found on GitHub here.