It’s becoming increasingly common to expose multiple interfaces for application - many applications has apps for iPhone, Android, Windows Mobile in addition to the web interface. Some part of your application functionality may be exposed through other ways like Chrome extension and Windows tile. Depending on nature of your application, you may potentially expose an API. For giving your users a seamless experience of accessing the application from various front-ends, your server needs to have versatile authentication mechanism. Forms authentication is a popular choice for securing ASP.Net and MVC applications. It could be used for securing even the Web API. However, there are a couple of issues which makes it less suitable for Web API. Forms Authentication uses cookies and redirection, which doesn’t go well with non-browser clients. Cookies could expose your API to potential Cross-Site Request Forgery(CSRF). Few client libraries do support cookies(i.e. WebClient), however, it’s not a good design choice when your services need to be accessible from a variety of platforms.
Web API comes with a built-in attribute Authorize (i.e. System.Web.Http.Authorize), which could be used to lock down your API. Implementation of this filter primarily looks at the Thread.CurrentPrincipal to determine whether the user is authenticated and has specified roles. CurrentPrincipal could be set when your authentication mechanism establishes the identity of the user. This identity could be accessed from anywhere in the code through Thread.CurrentPrincipal, any new threads would automatically get the identity set on the main thread. As opposed to generic custom filters, Authorize is built-in filter meant for authorization. Authorize filter gets executed before any other filters. You could apply this filter at action, controller level, or it could be registered as a global filter. Before we dwell deeper into the Web API processing pipeline, let’s take a small detour to see how we could address the sniffing venerability of the HTTP.
Keep the sniffers at bay
The fact that HTTP is text-based makes it versatile protocol widely available on virtually every platform. However, the pain-text nature makes it venerable to network sniffing. HTTPS adds a layer on top of HTTP adding security capabilities to it. HTTPS would protect against prying eyes as only the server and client can decrypt the traffic. Enforcing the need to use HTTPS for accessing your API would secure it against Man-In-the-Middle Attack up to great extent. Enabling HTTPS binding in IIS is relatively straight forward. If you need a quick refresher, I have put together the steps along with screenshots in this post - [Enabling HTTPS in IIS]. The next section would discuss a technique for denying the requests not using HTTPS with the appropriate message.
Web API Processing Pipeline

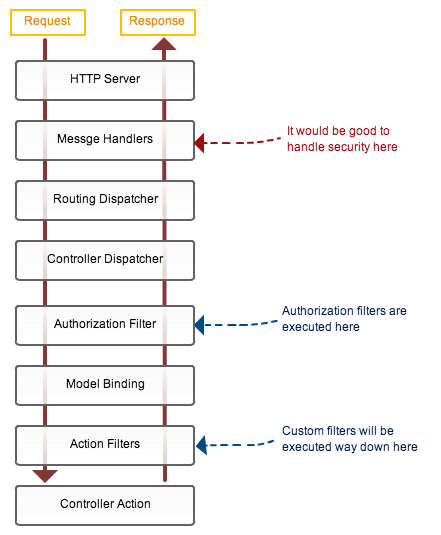
Let’s take a quick look at the Web API request processing pipeline to see what is the best place to perform authorization. As you cold see in the image, authorization filters get executed fairly deep in the Web API request processing pipeline, just before your action method. If we could move our security mechanism slight up in the processing pipeline, we could stop malicious requests there itself and prevent overheads of further processing. Another design advantage of moving the cross-cutting concern like security higher up in the stack is better control and flexibility. Instead of relying on the individual developer to add action filter attributes to each controller or action, you could control it at a higher level. You could drive the authorization based on metadata stored in the database or other storage. We could implement custom message handlers(class derived from DelegateHandler) which will allow us to tap into the request(that is HttpRequestMessage) earlier in the request life cycle. We could perform the necessary check and return the response from the message handler itself. Lets jump into the code to implement a message handler to ensure client is using secure line(i.e. HTTPS) for connecting to your API
public class HTTPSGuard:DelegatingHandler
{
    protected override Task<HttpResponseMessage> SendAsync(HttpRequestMessage request, CancellationToken cancellationToken)
    {
        if (!request.RequestUri.Scheme.Equals(Uri.UriSchemeHttps, StringComparison.OrdinalIgnoreCase))
        {
            HttpResponseMessage reply = request.CreateErrorResponse(HttpStatusCode.BadRequest, "HTTPS is required for security reason.");
            return Task.FromResult(reply);
        }

        return base.SendAsync(request, cancellationToken);
    }
}
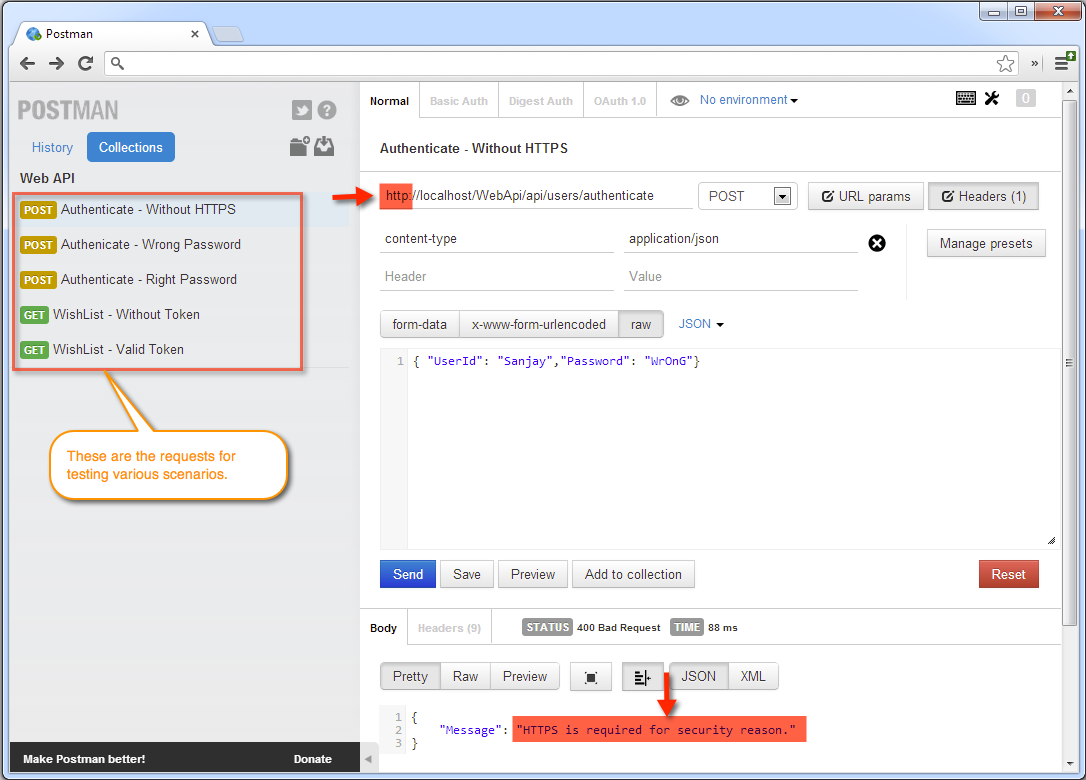
HTTPSGuard inherits from the DelegatingHandler and checks for the HTTPS scheme on the request URI. If the scheme is not HTTPS, it responds with HTTP 400 code(Bad Request) and a message saying HTTPS is required for accessing the API. We need to register message handlers in the WebAPIConfig under App_Start folder as shown below.
public static class WebApiConfig
{
    public static void Register(HttpConfiguration config)
    {
        config.MessageHandlers.Add(new HTTPSGuard()); //Global handler - applicable to all the requests
    }
}
This handler will be executed for each incoming request, we are making HTTPS as a requirement for all the operations of the API. Later in the next section, we will register handlers for specific route. You could use any HTTP tool like Fiddler or HTTP Client to quickly test the API. For testing the API, Chrome extension called Postman is my weapon of choice. It allows to save the requests, which comes handy while testing various security scenarios.

HTTPModule could also accomplish the same goal. However, the difference between MessageHandler and HTTPModule is that HTTPModule is IIS specific, whereas MessageHandler is host-agnostic. Message Handlers would work same while hosting on IIS or self-hosting.
Security Pattern
With HTTPS in place, it’s safe to request the user to provide credentials through our front end. But first, let’s establish a pattern for out security mechanism. There are various patterns that could be used to address your application specific security requirements. In this post, we will use a token based security pattern. Once the user is successfully authenticated, server will issue a token that needs to be passed by the client with every subsequent request as a proof of user identity.

The security token needs to be strongly encrypted to prevent forgery. The token will be issued and consumed by the same party - our server, so symmetric key encryption like Rijndael/AEC or DES would work fine. However, here I am using public-key cryptography for ease of managing the keys. The common use case of public-key cryptography/x.509 certificates involve sharing your public keys with the collaborating systems that could send data encrypted using your public key, which could be decrypted only using your private key. In our case, we don’t need to and shouldn’t share the public key with any other party as we are the issuer and consumer of the token. So, both keys need to be protected religiously to prevent forgery of the token.
Another security risk is session hijacking, someone could get hold of the token and could pose as a user. To avoid hijacking, we will associate the token to the user machine’s IP address, while validating the token we will be comparing it with the IP address from which the request is being made. Following is the token in plain text, with just two key value pairs separated by a comma.
UserId=ninja,IP=192.78.68.90
Following the class representing the token
public class Token
{
    public Token(string userId, string fromIP)
    {
        UserId = userId;
        IP = fromIP;
    }

    public string UserId { get; private set; }
    public string IP { get; private set; }

    public string Encrypt()
    {
        CryptographyHelper cryptographyHelper = new CryptographyHelper();
        X509Certificate2 certificate = cryptographyHelper.GetX509Certificate("CN=WebAPI-Token");
        return cryptographyHelper.Encrypt(certificate, this.ToString());
    }

    public override string ToString()
    {
        return String.Format("UserId={0};IP={1}", this.UserId, this.IP);
    }

    public static Token Decrypt(string encryptedToken)
    {
        CryptographyHelper cryptographyHelper = new CryptographyHelper();
        X509Certificate2 certificate = cryptographyHelper.GetX509Certificate("CN=WebAPI-Token");
        string decrypted = cryptographyHelper.Decrypt(certificate, encryptedToken);

        //Splitting it to dictionary
        Dictionary<string, string> dictionary = decrypted.ToDictionary();
        return new Token(dictionary["UserId"], dictionary["IP"]);
    }
}
Create the x.509 certificate by running following command on the Visual Studio command prompt while running as administrator
makecert -sr LocalMachine -ss My sha1 -n CN=WebAPI-Token -sk y exchange -pe
CryptographyHelper provides helper methods for encryption and decryption, code could be found here.
Put the guard in place
We have most of the pieces in place, so let’s create a message handler that will check for a token in the header of every incoming request.
public class TokenInspector : DelegatingHandler
{
    protected override Task<HttpResponseMessage> SendAsync(HttpRequestMessage request, CancellationToken cancellationToken)
    {
        const string TOKEN_NAME = "X-Token";

        if (request.Headers.Contains(TOKEN_NAME))
        {
            string encryptedToken = request.Headers.GetValues(TOKEN_NAME).First();
            try
            {
                Token token = Token.Decrypt(encryptedToken);
                bool isValidUserId = IdentityStore.IsValidUserId(token.UserId);
                bool requestIPMatchesTokenIP = token.IP.Equals(request.GetClientIP());

                if (!isValidUserId || !requestIPMatchesTokenIP)
                {
                    HttpResponseMessage reply = request.CreateErrorResponse(HttpStatusCode.Unauthorized, "Invalid identity or client machine.");
                    return Task.FromResult(reply);
                }
            }
            catch (Exception ex)
            {
                HttpResponseMessage reply = request.CreateErrorResponse(HttpStatusCode.Unauthorized, "Invalid token.");
                return Task.FromResult(reply);
            }
        }
        else
        {
            HttpResponseMessage reply = request.CreateErrorResponse(HttpStatusCode.Unauthorized, "Request is missing authorization token.");
            return Task.FromResult(reply);
        }

        return base.SendAsync(request, cancellationToken);
    }

}
X-Token is the HTTP header in which we expect the client to supply the token issued after authentication. Any request that doesn’t contain token is refused politely with HTTP 401 code. If the token is supplied, it is decrypted, user id is checked for validity against the identity store. The IP address in the token is matched with the IP address of the request to prevent session hijacking. We need to register this message handler in out API config class as shown below. UsersController provides operations for authenticating the user, so of course we can’t demand token on that request, so the is excluded by explicitly specifying the route.
public static void Register(HttpConfiguration config)
{
    //Create and instance of TokenInspector setting the default inner handler
    TokenInspector tokenInspector = new TokenInspector() { InnerHandler = new HttpControllerDispatcher(config) };

	//Just exclude the users controllers from need to provide valid token, so they could authenticate
    config.Routes.MapHttpRoute(
        name: "Authentication",
        routeTemplate: "api/users/{id}",
        defaults: new { controller = "users" }
    );

    config.Routes.MapHttpRoute(
        name: "DefaultApi",
        routeTemplate: "api/{controller}/{id}",
        defaults: new { id = RouteParameter.Optional },
        constraints: null,
        handler: tokenInspector
    );

    config.MessageHandlers.Add(new HTTPSGuard()); //Global handler - applicable to all the requests
}
You could download the code and play with it using any HTTP client to see it in action. The code along with unit tests could be found at https://github.com/patelsan/WebAPIAuthentication. I hope this was useful, I would love to hear your thoughts on this.